Lightning Flow and Test Coverage

If you read on the same sentence Flow and Test, what do you think is the article about? My first thought was “how to test a flow in order to avoid issues.” Something like this one.

However, my entry would like to focus on Test Coverage as it is a key point that could be a pain if you need to deploy Flows in active mode. The reason, they also require to have a 75% of coverage at least, in order to get a success deploy.

Flow Test Coverage? I thought this is a #clicksnotcode tool …

Yes and it may not make sense if you are working with Screen Flow. In fact, we do not need to worry about test coverage on these kind of flows. However, you need to keep in mind those that work without screens such as autolaunched flows. You can have more information here.

And how can we do it? Like the documentation says, via a Trigger.

Let’s try to explain it with an example.

If you have read some others entries, you will already know my Flow examples are based on a Hotel Reservation App. So below example is related to Reservations. The scope of the autolaunched flow is to send an email to the guest once he pays the reservation.

And in order to make it work, I need to call it from my Trigger.

trigger ReservationTest on Reservation__c (before insert, before update)
{
    for(Reservation__c r : Trigger.new)
    {
        if(r.isPaid__c)
        {
            System.debug('Run the email flow');
            
            Map<String, Object> params = new Map<String, Object>();
            params.put('guestEmail', r.guestEmail__c);
                
            Flow.Interview.EmailFlow flowToSendEmail = new Flow.Interview.EmailFlow(params);
            flowToSendEmail.start();
        }
    }
}

Now, that we have the new flow, we need to check Flow Coverage status. But the first execution is to identify all Active elements we have in the org in order to be able to calculate the coverage.

Running this query:

Select MasterLabel,
	Definition.DeveloperName,
	VersionNumber,
	Processtype
 FROM Flow 
 WHERE Status = 'Active' 
    AND (ProcessType = 'AutolaunchedFlow' 
       OR ProcessType = 'Workflow' 
       OR ProcessType = 'CustomEvent' 
       OR ProcessType = 'InvocableProcess')

We get below result, and we can identify 2 Autolaunched flow. One of them is the EmailFlow, the one we are using on this example.

Run on Developer Console with Use Tooling API checked

On the other side, Salesforce provides an object in order to check coverage, FlowTestCoverage and we will use it in order to check EmailFlow one. However it only returns a record if there is already some coverage of the elements, so the easiest way to start checking it is modify previous query adding as a filter where the Id not in on the new FlowTestCoverage object.

Select MasterLabel,
		Definition.DeveloperName,
		VersionNumber,
		Processtype
 FROM Flow 
 WHERE Status = 'Active' 
    AND (ProcessType = 'AutolaunchedFlow' 
       OR ProcessType = 'Workflow' 
       OR ProcessType = 'CustomEvent' 
       OR ProcessType = 'InvocableProcess')
    AND Id NOT IN (SELECT FlowVersionId FROM FlowTestCoverage)

The query result is the same as before so we can start writing our first test in order to cover EmailFlow one.

@isTest
public class EmailFlowApexTest
{
	static testMethod void validateEmailFlow()
    {
        Reservation__c r = new Reservation__c();
        r.isPaid__c = true;
        r.guestEmail__c = 'a@ff.com';
        insert r;
        
	    List<Reservation__c> rList = [Select Id, isPaid__c, guestEmail__c from Reservation__c where Id = :r.Id];
        System.assert(true, rList.get(0).isPaid__c);
    }
}

Now, this test covers the trigger that starts EmailFlow, so if we run previous query again, now, EmailFlow will not appear as part of the result, and running a query against FlowTestCoverage, we can start getting some information about our job.

SELECT Id, 
 	ApexTestClassId, 
 	TestMethodName, 
 	FlowVersionId, 
 	NumElementsCovered, 
 	NumElementsNotCovered 
 FROM FlowTestCoverage

Where we can see how match the FlowVersionId with ours, and also the TestMethodName we defined above, validateEmailFlow.

Now I wonder: What about if our test has more than one step? What does happen with above result? So let’s go for it. After the email is sent, we will have a decision element that will check the total amount of the reservation. After that, do an assignment to a certain object. We could continue adding more complex to the flow but let’s keep it simple so far.

The first step is to modify the test in order to have an amount higher or less than the decision filter.

@isTest
public class EmailFlowApexTest
{
    static testMethod void validateEmailFlow()
    {
        Reservation__c r = new Reservation__c ();
        r.isPaid__c = true;
        r.guestEmail__c = 'agarcia@financialforce.com';
        r.TotalAmount__c = 100;
        insert r;
        
	    List<Reservation__c> rList = [Select Id, isPaid__c, guestEmail__c from Reservation__c where Id = :r.Id];
        System.assert(true, rList.get(0).isPaid__c);
    }
}

With this, if we run below query,

SELECT Id, 
     ApexTestClassId, 
     TestMethodName, 
     FlowVersionId, 
     NumElementsCovered, 
     NumElementsNotCovered 
 FROM FlowTestCoverage

We get a similar result as the previous one. The only difference is that NumElementsCovered is 3 while NumElementsNotCovered is 1 . The reason is because now, our flow has 4 elements, the core one that sends the email, the decision and the 2 assignments. But our test only covers one of the assignments.

So next step is to add a second method that covers the second decision path.

@isTest
public class EmailFlowApexTest
{
    static testMethod void validateEmailFlow()
    {
        Reservation__c r = new Reservation__c ();
        r.isPaid__c = true;
        r.guestEmail__c = 'agarcia@financialforce.com';
        r.TotalAmount__c = 100;
        insert r;
        
	List<Reservation__c> rList = [Select Id, isPaid__c, guestEmail__c from Reservation__c where Id = :r.Id];
        System.assert(true, rList.get(0).isPaid__c);
    }
    
    static testMethod void validateEmailFlowWithAmountLessThan50()
    {
        Reservation__c r = new Reservation__c();
        r.isPaid__c = true;
        r.guestEmail__c = 'agarcia@financialforce.com';
        r.TotalAmount__c = 25;
        insert r;
        
	List<Reservation__c> rList = [Select Id, isPaid__c, guestEmail__c from Reservation__c where Id = :r.Id];
        System.assert(true, rList.get(0).isPaid__c);
    }
}

And this time, the query execution returns below result where we can see the second testMethod.

Also we can check both have same values on NumElementsCovered and NumElementsNotCovered because each one cover a single path.

Note: Whenever I made a modification on my trigger, the query took a while (even a day) to get the results. It’s like Salesforce needed some time to process new test coverages.

Finally I would like to talk about how we know we achieve the 75% required in order to be able to deploy my flow. Unfortunately Salesforce does not provide the information yet but explain a way to calculate it manually.

For example, if you have 10 active autolaunched flows and processes, and 8 of them have test coverage, your org’s flow test coverage is 80%.

Salesforce help: https://sforce.co/2PqALZw


Having that, if I only have a single flow in my org with some test coverage, per above info, my flow coverage is 100%. However I would not be surprised if they look into the test flow and check the number of elements. So if I have 4 elements and 2 are covered, my coverage is 50% and if I cover 3, I achieve the 75% required. Keep this in mind just in case.

Update 20190726

While I was writing this post, I found out some weird behaviours with tests. If I removed a test method that covered a flow and run the query again, results were same as if I had the test in place. Because of that, I decided to raise a case with Salesforce in order to know more, and I would really like to share the final answer with you.

When we first run a test class it will add a record for each method to the FlowTestCoverage object. If we modify the class to add a new method and run it again, then, it will add a new record for the new method. But if we remove a method it will not delete the record. The record will only be removed if a change is made to the associated flow version.

If we delete the test class completely it will remove all FlowTestCoverage records for the related class since it no longer exists.

If you would like the FlowTestCoverage object to reflect changes made to test classes then, the best way to do this would be to create a new version of the flow and run the test classes against the new version.

Hope it helps others.

New Lightning Component for Maps

New Lightning Component for Maps

20180126 UPDATE!! I got some new and very useful information about maps. Please, go to Latest Update section if you have already read this entry

A couple of years ago, I wrote a post about how to visualise maps and locations on Visualforce pages, and without having that in mind, Winter ’19 helped me to deliver a second part of that one. Now, Salesforce has released a new Map Lightning Component, so I will give it a try before moving to Spring ’19 version.

You will also find a similar example on Winter ’19 maintenance exam challenge. My code is much simpler than the maintenance one, so maybe it is a good start point before making it more complex.

In a similar way as the old post, I need an object with the information to show. In my case, Doctor object with a record about my Dentist, including a Geolocation field, the Location__c one.

Having that, I need to write some code in order to deliver a Lightning Component that call the standard Map component.

I will start with the Controller in Apex in order to retrieve the information from the database. Remember that Geolocation fields is a compound field with 2 pieces, Latitude__s and Longitude__s.

public with sharing class DoctorMapController
{
   @AuraEnabled
   public static List<Doctor__c> getDoctors()
   {
      List<Doctor__c> doctors = [Select Id,
                                   Name, 
                                   Address__c,
	                           Email__c, 
                                   Phone__c,
	                           SurgeryName__c, 
                                   Location__Latitude__s,
                                   Location__Longitude__s
                                 FROM Doctor__c];
      return doctors;
   }
}

We will continue with the component.

First of all, we implement usual interfaces in order to be able to visualise the component on different areas/views of our environment.

Secondly, I will add the tag <lightning:map> and its properties in order to show map information. The most important is mapMarkers. It is an array of markers that will help us to set the usual “pointer globe” icon that google maps provides. After that, we can add others like markerTitle or zoomLevel but they are not required, they just add more value to the component and the visualisation itself.

So having to provide information to mapMarkers and others, we need attributes in order to retrieve the data from our component Controller. That’s why we have 2 <aura:attribute> They are like variables on an apex class. Define the type and name of the variables that you will use among the component to get and set the data you need.

Finally <aura:handler> that will execute the action that will initialise the component via the javascript Controller. It is like the start point.

<aura:component implements="force:appHostable,
                            flexipage:availableForAllPageTypes,
                            flexipage:availableForRecordHome" 
                controller="DoctorMapController" 
                access="global" >
   <aura:attribute name="mapMarkers" type="Object" access="PRIVATE" />
   <aura:attribute name="markersTitle" type="String" access="PRIVATE" />
   <aura:handler name="init" value="{!this}" action="{!c.init}"/>
   <aura:if isTrue="{!!empty(v.mapMarkers)}" >
      <lightning:map 
		     mapMarkers="{!v.mapMarkers}" 
		     markersTitle="{!v.markersTitle}"
                     zoomLevel="5"
      />
   </aura:if>
</aura:component>

And the init, points to here, the javascript Controller. It depends on the way you develop. Actually you can add all method logics to here, but it is a good practice to have it on the Helper, and on the Controller, just a call to there.

({
   init : function(component, event, helper) {
	helper.initHelper(component, event, helper);
   }
})

Finally a Helper where we will find main methods. If you are familizarize with Javascript, it will not be very difficult to understand.

Basically the variable action, access our Apex Controller getDoctors method in order to retrieve all Doctor__c records.

With this information, we can iterate over there and show all doctors on our map. But my case is much simpler, I get the first one, and populate another variable with its information. Finally I will set the values to the component attributes, markTitle and mapMarkers.

But let me focus for a second on the variable that is assigned to mapMarkers attribute. The variable markers is an array because, as I mentioned at the beginning, mapMarkers parameter is an array with locations. But what do I need to specify there? The main one is Location that could be populated with the Geolocation field data or with a direction itself. After that we only have some more descriptive data like the title or the description. They add value to the map but the required one is Location.

({
   initHelper : function(component, event, helper) {
        helper.defineMarkers(component, event, helper);
   },
   defineMarkers : function(component, event, helper) {
	let action = component.get("c.getDoctors");
	action.setCallback(this, function(response) {
	   const data = response.getReturnValue();
	   const dataSize = data.length;
	   let markers = [];
        
           //I will only show my single record
	   const dentist = data[0]; 
	   markers.push({
                'location': {
                    'Latitude':dentist.Location__Latitude__s,
                    'Longitude':dentist.Location__Longitude__s
                },
                'title' : dentist.SurgeryName__c,
                'description' : 
                      dentist.SurgeryName__c + 
                      ' dentist Location at ' + 
                      dentist.Address__c
	   });
	   component.set('v.markersTitle', 
                         'Out and About Communications Dentist 
                         Locations');
	   component.set('v.mapMarkers', markers);
	});
	$A.enqueueAction(action);
   }
})

And here you can find the result, a map with the “Moyua Square” with a pointer to my dentist place.

Reading this entry you can realise that using <lightning:map> is very simple and that actually, I focused on explain how to build the component itself, but if you would like to know more or create more complex pieces of code, take a look at the documentation and do some searches on internet. I’m sure people share their experiences with the new <lightning:map>.

Latest Update:

After reading this entry, my friend Alba Rivas told me she was doing some researches on maps too, and found out some useful information that shared with me:

If an address is specified for a marker, instead of its latitude and longitude, the component makes API requests to the google geolocation, and per Google documentation, it seems it has a cost. Also I would like to know if there is an event that I can listen when a marker is selected.

The API key is from Salesforce, and there are no current limitations on its use. We are going to add a click handler for selecting a marker in an upcoming release

Alba Rivas question and Salesforce response

Visual Flow & Lightning Components (I)

Visual Flow & Lightning Components (I)

It’s a fact that Visual Flow needed something that could make it more attractive to developers, and Salesforce did it.

Now we are able to integrate a Lightning Component as part of the Flow with just drag and drop and this blog will explain how easy it is.

Please, take into account that if your org is on Spring ’19, the look and feel of the Cloud Flow designer would be different because Salesforce is going to deliver Flow Builder

Using Standard Lightning Component

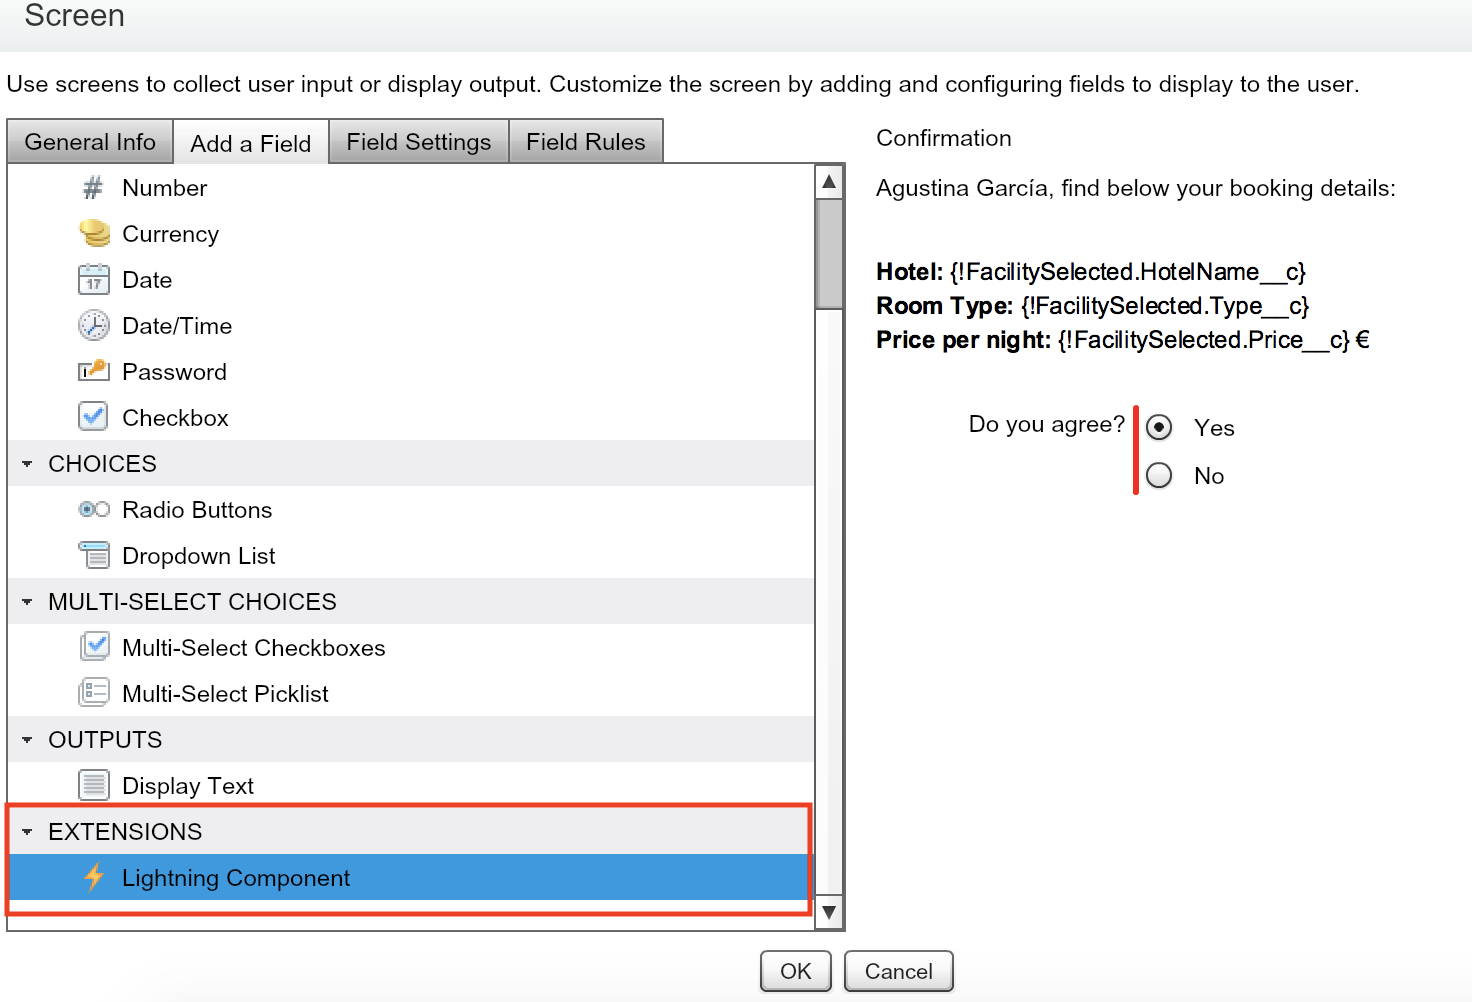
When we add a new screen to the flow, the first action is to add some new fields to show them. If we click on “Add a Field” tab, we  can scroll down and under Extensions section, we can find Lightning Components label.

Captura de pantalla 2018-11-30 a las 20.30.40

After adding it to the screen, you need to highlight it, so that you would be able to see all Standard Lightning Components that Salesforce already provides and we can use.

My example already have 2 radio buttons in order to decide if I would like to go ahead with the booking process or I prefer to stop it.

Captura de pantalla 2018-11-30 a las 20.34.09.png

And I would like to show something nicer like a toggle, the one that I already selected.

Winter ’19 provides new Lightning Components we can add to flows. Toggle is one of them.

So the result would be like below image.

Using Custom Lightning Component

But what about if you don’t find the Lightning Component you really need on Flow? That is not a problem, because you can also create your custom Lightning Component and add it to the Flow.

Let’s talk about another example. We will create a simple Flow with 2 DatePickers. The first one is provided by Flow, however the second is a custom Lighting Component. How does it look like?

Captura de pantalla 2018-12-20 a las 9.46.35.png

Their look and feel are similar and both work like tweens. The only difference with the Lightning component is that we can customize it. For instance, you can see that the size is larger than the flow one. Or you can change background color for instance.

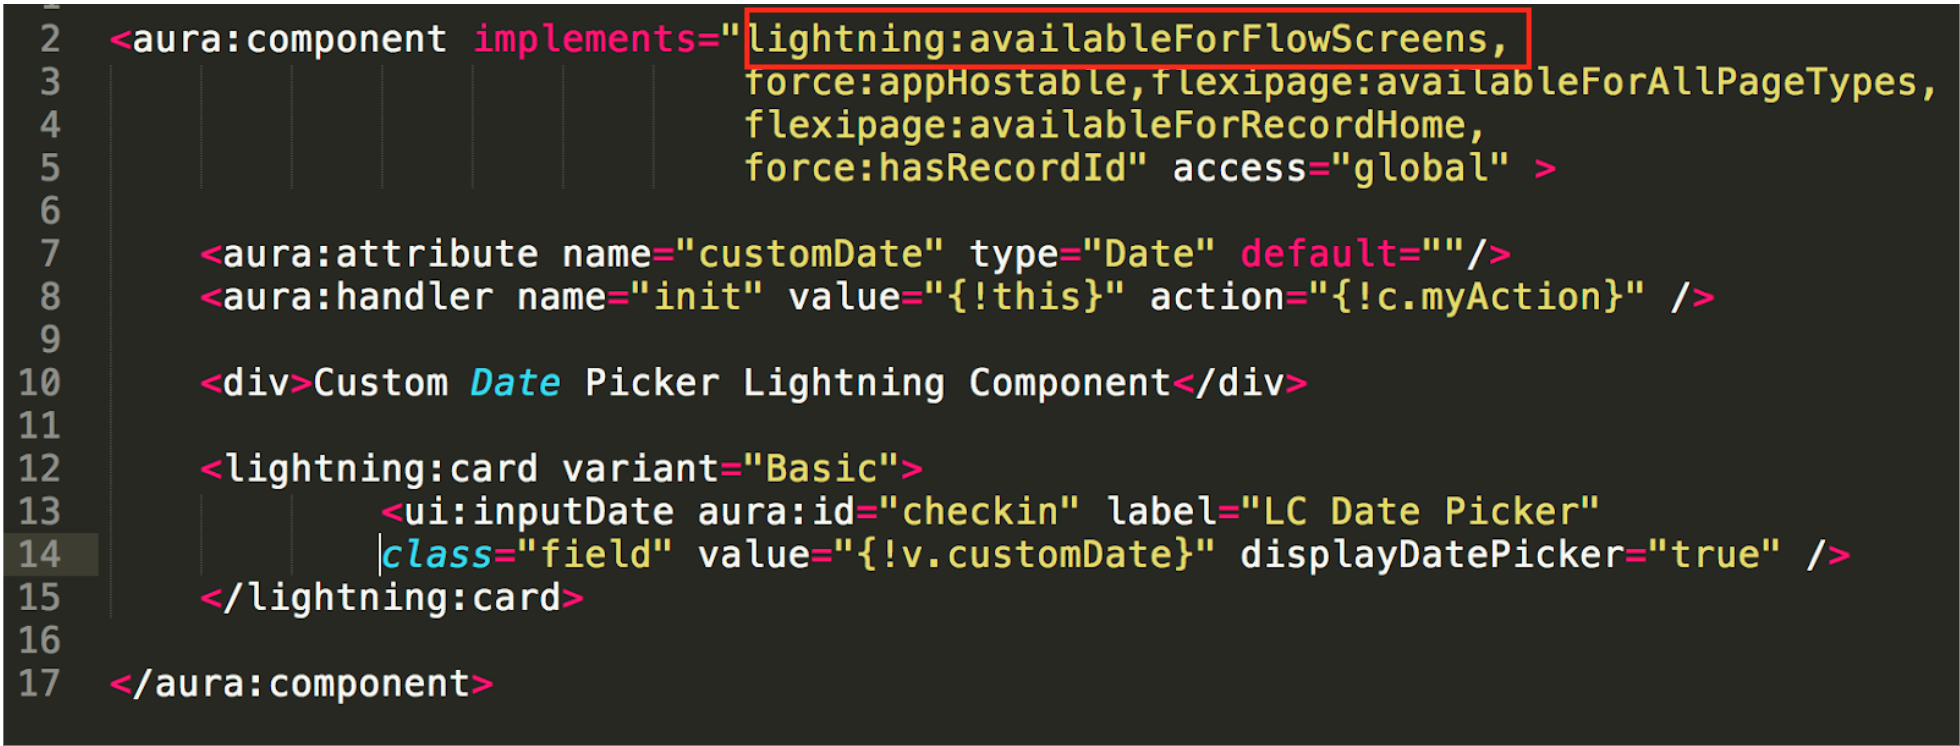
How can we visualize in the Flow? First of all, remember that the DatePicker is a custom Lighting Component, so yes, you need to be sure that you implement a new interface in order to make it visible: lightning:availableForFlowScreens

Captura de pantalla 2018-12-20 a las 13.07.27

So doing that, it will appear on flow with all standard lightning components that Salesforce already provide, so it is just a matter of drag and drop.

Captura de pantalla 2018-12-20 a las 13.17.47

And that’s all, you have integrate your custom Lightning Component into your Flow.

Now Flow is beautiful as well as useful

API to Create a Sandbox Org

Some weeks ago I published my first try  with Tooling API where I could explain how to create a Custom field with this API, but when I worked on that, what I really needed was to create a Sandbox programatically. OMG!! A Sandbox!! And how can I do it?

At the end, a Sandbox is metadata, and as we learnt on my previous blog, Tooling API will help you to create metadata records. SandboxInfo is the object that represents a Sandbox, and we will use it to create our new environment.

SandboxInfo supports Get, Post, Patch and Delete REST API calls, that means, that with Post we will create a new Sandbox, with Patch we will do an update, a refresh at the end, and the Delete would remove the organization.

As you can see in the link there are lot of options when you create a Sandbox, like create the copy Chatter from production to Sandbox, or event it gives you the option to use Template to create the org. But if you need a simple environment, with below JSON body is more than enough:

{
   "Description": "New Test Sandbox",
   "HistoryDays": 0,
   "LicenseType": "DEVELOPER",
   "SandboxName": "SandboxTest"
}

And in order to execute it you can make a Post REST call with this url:

/services/data/v42.0/tooling/sobjects/SandboxInfo

This call will return an Id that you can use in order to check the creation progress via another object, SandboxProcess. You can perform a query against this object filtering by SandboxInfoId field, and get useful information such us CopyProgress that represents how much of the copy has been already performed.

Finally I would like to remind you that you could only make this call against a Production org, and if your user has the rights to create Sandboxes. Otherwise, it will fail.


From Attachment to File via Flow?

Some days ago I got a message asking me if it was possible to move from Attachments to Files in Salesforce using the #clicksnotcode tool VisualFlow and after some researches I would say no, this is not possible without code. But if you find the way, please, please, please, leave me a message so that I can update this post.

So, what is this post about? My researches and how I got that the answer is no.

First of all, the use case. As you know we cannot create Attachments in Lightning Experience, only Files are available in LEX, so anything that we want to keep should be also migrated.

But how?

  • Manually? That could be a really expensive option, and tired, to be honest.
  • Via code? Yes!! I like this option. At the end, a File is a Salesforce Object, ContentVersion , and as you can find on this blog, with a really simple piece of code you can create a new File record. Below piece adds the query to an attachment. After that, find the image with the new file and also the result of a query done in  Workbench.
List<Attachment> attList = [SELECT 
                               Body,BodyLength,Name,ParentId 
                            FROM Attachment limit 1];
Attachment att = attList.get(0);

String fileContent = att.body.toString();
ContentVersion conVer = new ContentVersion();
conVer.PathOnClient = 'MigratedFile.txt';
conVer.Title = 'MigratedFile.txt';
conVer.Description = att.Name + ' migrated';
conVer.VersionData = EncodingUtil.base64Decode(fileContent);
conVer.FirstPublishLocationId = '001B000000hYespIAC'; 
insert conVer;

Captura de pantalla 2018-06-28 a las 17.15.33

Captura de pantalla 2018-06-28 a las 17.20.22

And what about VisualFlow?

I created something really simple, 4 steps flow. But it has a welcome and a thanks screen, so actually the job is done in 2 steps.

Captura de pantalla 2018-06-28 a las 17.30.46

First one is Record Lookup where I retrieve the single attachment that I have in my organization. Please, keep in mind that if you have a list of Attachments, and use a Record Lookup, it will return a single record, but if your idea is to retrieve all attachments, you need to use a Fast Record Lookup step.

Captura de pantalla 2018-06-28 a las 17.31.10

This step is going to store data into the variable that I created, and all of them are similar, Text variables.

Captura de pantalla 2018-06-28 a las 17.31.48

The second step is to create the ContentVersion record, assigning the variable data that I got on the previous step.

Captura de pantalla 2018-06-28 a las 17.32.00

And that is all. Yes, so simple.

However, when I run it I got an error and this email where I can see that there is an issue on VersionData field.

Captura de pantalla 2018-06-28 a las 17.42.18

The reason is simple. Attachment Body returns a Blob that I need to convert into String in order to be able to encode and pass to the Content file.

....
String fileContent = att.body.toString();
....
conVer.VersionData = EncodingUtil.base64Decode(fileContent);
....

Is there a way to fix it? No as far as I could find. My first idea was to check what the variable was returning, adding a middle step to show the body value

Captura de pantalla 2018-06-28 a las 17.55.06

And as I expected that is not my body text

Captura de pantalla 2018-06-28 a las 17.54.46

So the next thought was to try to create a formula in flow or make any transform, something that could help me, but I couldn’t find any.

Captura de pantalla 2018-06-28 a las 17.51.16

So I think that the only way to do it is via some Apex code. We can create a class that has InvocableMethod annotation and do the transform there and call the class as it was an step, but, to be honest, why do I want to do it when I can run the whole transform from an apex class as I explained before?

At the end, I would advice to create your own ApexClass that execute the process to do the migration if you do not want to use the tool that Salesforce provides.

Good luck!!

API to Create CustomField

In the last few weeks, and for my first time, I started working with the Salesforce Tooling API. This scared me a bit because new beginnings are hard for me, but at the same time I liked the challenge.

In a similar way other Salesforce APIs help you to get records data, Tooling API is used in order to access / create metadata. But Tooling could sound weird, how can I run this one? Not difficult at all as this is also accesible via SOAP and REST API. What does it mean? You can make Tooling API calls via REST calls as long as the Object says that. For instance, ApexCodeCoverage supports Query and Get REST API calls, while with CustomField you can also do Post and Patch calls.

Let’s dig a bi. If you open Workbench and execute

/services/data/v42.0/tooling/sobjects/CustomField

you get information about this Salesforce object, so the Get REST API call works.

Captura de pantalla 2018-06-03 a las 14.22.08

But what about if I need to retrieve information about a certain CustomField? Same as you were trying to get information about a certain Account record.

Having the custom field Field1__c, I only need to look for its Id

Captura de pantalla 2018-06-03 a las 14.26.42Captura de pantalla 2018-06-03 a las 14.26.52

and use it in the get call

/services/data/v42.0/tooling/sobjects/CustomField/00Nb0000009GqvP

Getting this result

Captura de pantalla 2018-06-03 a las 14.29.51Captura de pantalla 2018-06-03 a las 14.30.08Captura de pantalla 2018-06-03 a las 14.30.18

That is really cool, but what I really need is to create a new custom field related to CO1__c custom object, and maybe I didn’t write the right words in google, but I didn’t find it anywhere so I took me few rounds till I get it.

My first try was to create a JSON body following Salesforce help:

{ 
   "DeveloperName": "CO1__c.test__c", 
   "ManageableState": "unmanaged", 
   "Metadata": { 
      "label": "test", 
      "description": "my new test field", 
      "length": "32", 
      "type": "string" 
   }, 
   "TableEnumOrId":"01Ib0000000gSh6"
}

And after running a POST call with the url:

/services/data/v42.0/tooling/sobjects/CustomField/

I got this error:

Captura de pantalla 2018-06-03 a las 14.40.51.png

So I continued testing things. Removing fields, changing values etc, till I got it with the following JSON body

{ 
   "FullName": "CO1__c.test__c", 
   "Metadata": { 
      "label": "test", 
      "description": "my new test field", 
      "required": false, 
      "externalId": false, 
      "type": "Text", 
      "length": 32 
   }
}

Getting the result:

Captura de pantalla 2018-06-03 a las 14.45.05

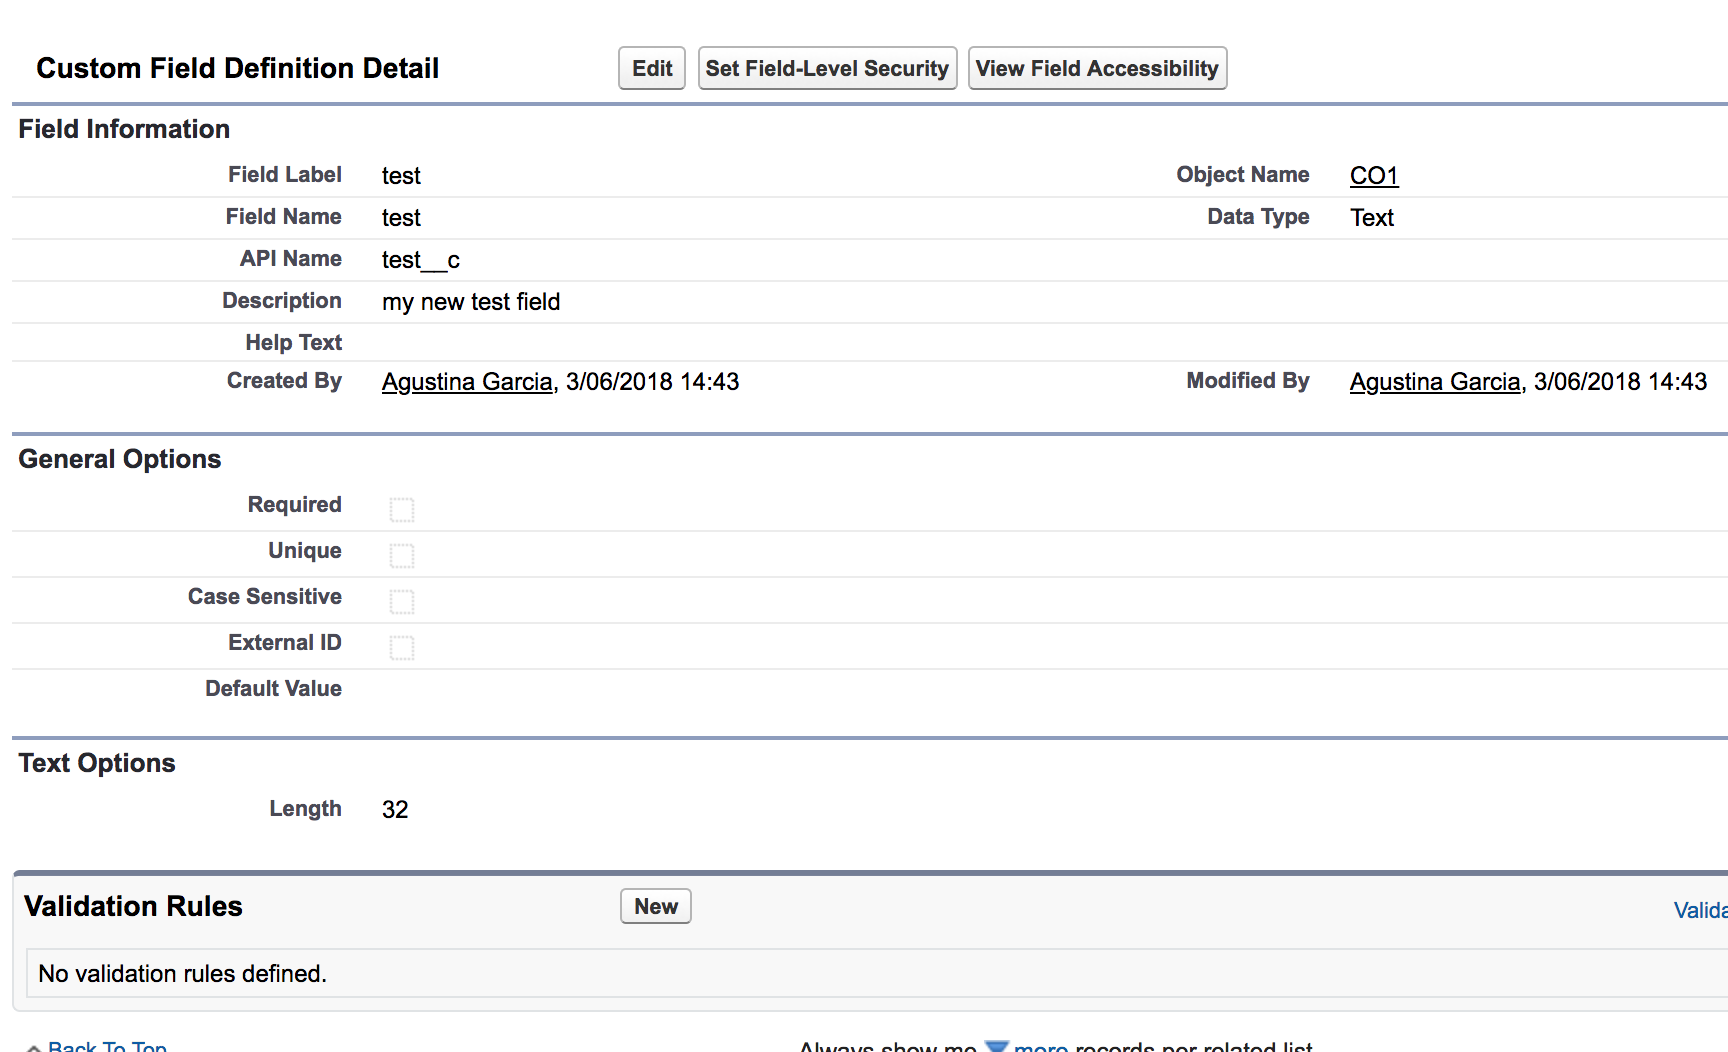
And in the org the new field created

Captura de pantalla 2018-06-03 a las 14.45.22

What about if I need to do it in Apex? With a simple HTTPRequest call you can run same code I executed in workbench.

Another alternative is create your own ToolingAPI wrapper class as Andy Fawcett explains on this old entry.

And that is all for this entry, but don’t think this was my original challenge. What I was asked to do was to check if I could create a Sandbox environment via the Tooling API … keep an eye on future blogs because I will publish it if I get it 😉

Visualforce y Lightning Experience

Después de un gran parón en mi blog debido a dreamOlé y otros eventos, hoy me gustaría publicar un post muy pero que muy pequeñín sobre una funcionalidad que nos trae la Summer ’18: visualizar una página Visualforce con estilo Lightning Experience.

Lo primero de todo, comencemos con la pregunta:

¿Trabajas en Lightning Experience?

Si, tu respuesta es NO … no eres el único, ya que una servidora sigue abriendo Classic UI casi siempre, pero chicos, hay que ser valientes y movernos a LEX !!!

Una de las razones por las que sigo en Classic es porque soy de la vieja escuela, y cuando tengo que montar una nueva UI me voy a Visualforce en vez de Lightning Components. Segundo error …. es hora de perder el miedo a Lightning Components y empezar a desarrollar UI de la forma que Salesforce nos aconseja.

¿Qué pasa si mi producto tiene ya cientos de páginas Visualforce? ¿Debo migrar todo a Lightning Components?

Teniendo en cuenta que el tiempo que puedes necesitar para ello puede ser elevado, y que desgraciadamente Lightning Components no ofrece toda la funcionalidad de Visualforce, yo migraría aquello que fuera sencillo. Por otro lado, si hay que hacer una nueva UI, revisad primero si Lightning Components os sirve.

¿Qué hacemos con el resto?

Salesforce responde a nuestras súplicas, y en mi caso, casi me echo a llorar cuando vi lo sencillo que era aplicar el estilo Lightning Experience a una página existente, de forma que pasamos de esto:

Captura de pantalla 2018-05-25 a las 11.44.33

A esto:

Captura de pantalla 2018-05-25 a las 11.45.42

¿Cómo lo hemos conseguido? Fácil.

Para ello necesitamos una Visualforce, que hemos rescatado de esta entrada, donde creábamos una vista alternativa a una cuenta, junto con su listado de oportunidades.

Una vez que tenemos nuestra página Visualforce, tenemos que asegurarnos que será visible en Lightning Experience, para lo que tenemos que marcar el checkbox “Available for Lightning Experience, Lightning Communities and the mobile app”

Captura de pantalla 2018-05-25 a las 11.43.51

Con esto conseguimos visualizar la página en Lightning Experience. Es decir, sin este checkbox, aunque usemos esta página para sobre-escribir la vista de un registro de Account, y la visualicemos en Classic UI, si nos movemos a LEX, visualizaremos la página Standard de Salesforce en LEX en vez de la nuestra.

Y por último (si un último paso!!) sólo tenemos que añadir lightningStyleSheets="true" al tag <apex:page> de forma que nuestra página quedaría así:

<apex:page standardController="Account" lightningStyleSheets="true">
 <apex:form >
  <apex:pageBlock title="Vista Cuenta">
   <apex:pageBlockButtons >
    <apex:commandButton value="Edit" action="{!edit}"/>
   </apex:pageBlockButtons>

   <apex:pageBlockSection title="Campos Cuenta" columns="2">
    <apex:outputField value="{!account.name}"/>
    <apex:outputField value="{!account.site}"/>
    <apex:outputField value="{!account.type}"/>
    <apex:outputField value="{!account.accountNumber}"/>
   </apex:pageBlockSection>
  </apex:pageBlock>
 </apex:form>
 <apex:relatedList list="Opportunities" />
</apex:page>

Si quieres saber más, échale un ojo a este link.


BigObjects and Triggers

Some months ago I wrote an entry about BigObjects and since that moment I go lot of comments with questions and some useful information that I missed in my post and I would like to include here because sometimes, we do not read comments.

Not all SOQL statements are valid. For now, the !=, LIKE, NOT IN, EXCLUDES, and INCLUDES operators are not valid in any query.

There are already some Standard Big Objects like FieldHistoryArchive, so do not try to create one directly, and check before if it already exist.

Unfortunately SOSL is not supported by BigObjects.

But maybe the most important one was the fact that people was not able to create BigObject records from Triggers. It was a big surprise for me because documentation said that you could not create triggers related to a Big Object, but nothing about not be able to create Big Object records from triggers. So today I decided to give it a try.

If you have taken a look at my blog, the use case was to archive Code Review records so that we could end up with Code Review History records. Although it doesn’t make too much sense, create History records in a trigger, I decided to make it simple and continue with these objects.

So the first idea was to create a Trigger related to CodeReview__c:

trigger CodeReviewTrigger on CodeReview__c (after insert)
{
   List<CodeReviewHistoric__b> crhToInsert = new List<CodeReviewHistoric__b>(); 
   for (CodeReview__c cr: Trigger.new)    
   { 
      CodeReviewHistoric__b crh = new CodeReviewHistoric__b();        
      crh.CanBeMerged__c = cr.CanBeMerged__c ? 'true' : 'false';        
      crh.CodeReviewDate__c = cr.CodeReviewDate__c;         
      crh.Comments__c = cr.Comments__c;        
      crh.Employee__c = cr.Employee__c;        
      crh.Score__c = cr.Score__c;        
      crh.Story__c = cr.Story__c;        
      crhToInsert.add(crh);    
   }
   Database.insertImmediate(crhToInsert);
}

However, when I tried to create a Code Review record via the UI, I got below error

Captura de pantalla 2018-02-18 a las 15.16.26

and if I checked log, I also got this one.

Captura de pantalla 2018-02-18 a las 15.16.54

So came back to BigObjects product manager suggestion:

However a workaround could be to put the insertImmediate() call into a queueable method

But why queuable method? I think the key point is that we need a different context, a new transaction, so it doesn’t matter the way to get it, and I decided to keep things simple using a @future method in order to perform the Database.insertInmediate action. Then, this method will be called from the trigger.

But this annotation has several restrictions, like argument types. It doesn’t support a list of SObjects, but it allows a List of Ids.

So Trigger will look like this:

trigger CodeReviewTrigger on CodeReview__c (after insert)
{    
   List<Id> codeReviewIds = new List<Id>(); 
   for (CodeReview__c cr: Trigger.new)    
   {        
      codeReviewIds.add(cr.Id);    
   }
   AsyncProcess.createBigObjectRecords(codeReviewIds);
}

And @future one like this:

public with sharing class AsyncProcess
{
   @future
   public static void createBigObjectRecords(List<Id> crIds)
   {
      List<CodeReviewHistory__b> crhToInsert = new List<CodeReviewHistory__b>();
      for (CodeReview__c cr: [Select Id, 
                                     CanBeMerged__c, 
                                     CodeReviewDate__c, 
                                     Comments__c, 
                                     Employee__c, 
                                     Score__c, 
                                     Story__c 
                               From CodeReview__c 
                               Where Id In :crIds])    
      {
         CodeReviewHistory__b crh = new CodeReviewHistory__b();
         crh.CanBeMerged__c = cr.CanBeMerged__c ? 'true' : 'false';            
         crh.CodeReviewDate__c = cr.CodeReviewDate__c;             
         crh.Comments__c = cr.Comments__c;            
         crh.Employee__c = cr.Employee__c;            
         crh.Score__c = cr.Score__c;            
         crh.Story__c = cr.Story__c;            
         crhToInsert.add(crh);    
      }     
      Database.insertImmediate(crhToInsert);    
   }
}

And now it works sucessfuly

Captura de pantalla 2018-02-18 a las 16.37.46

Captura de pantalla 2018-02-18 a las 16.39.40.png

Any other options? Batch Apex, Queueable, even, you can use Async SOQL via a http call.

I’m sure that I still miss things about BigObjects but another amazing resource to check is the Salesforce MVP Alba A. Rivas blogs about this technology.


Se acercan más eventos …

Tengo la sensación de que últimamente sólo escribo sobre eventos, y estoy dejando un poco de lado las entradas técnicas. Tengo varios “to-do” en mente, pero un porcentaje bastante alto de mi participación en la Comunidad de Salesforce es por medio de eventos, así que ahí va otro post hablando de lo mismo…

Próximas fechas destacadas en Bilbao:

2 de Marzo

Tendremos el primer Salesforce Developer Group del año en Bilbao y llegamos pegando fuerte. Mi compañero de FinancialForce, Yoel Caises, que está haciendo un doctorado en Data Mining en la Universidad de Granada, ha estado explorando Einstein y nos contará todo lo que ha aprendido en estos últimos meses. Más información aquí.

20 de Abril

Segundo SDG de Bilbao. Si, tenemos otro evento ya anunciado, pero es que Trailhead DX está a la vuelta de la esquina (28 y 29 de Marzo) y posteriormente celebraremos un Global Gathering para acercar todo lo que se anunció en esta conferencia, a aquellos que no podemos asistir. ¿Quieres apuntarte? Utiliza este link para ese meetup.

27 de Abril

Un día muy importante en mi calendario, y no sólo porque sea el cumpleaños de mi querida hermana, sino porque celebramos dreamolé ’18 en el hotel Catalonia Barcelona Plaza.

Siempre y cuando nuestro público sea receptivo a la idea, los organizadores de dreamOlé queremos tener un evento itinerante. Comenzamos en la capital de España, Madrid, y ahora no movemos a la segunda ciudad más importante del país, Barcelona.

Para aquellos que no sepáis qué es dreamOlé, en nuestra web podéis encontrar más información, pero básicamente es 1 día dedicado a la comunidad.

A lo largo de todo el mundo, surgió la inquietud de acercar Dreamforce a aquellos que no pueden ir a una conferencia de tal magnitud en San Francisco, naciendo así los “dreamin events”. Y dreamOlé es uno más.

¿Y qué puedes encontrar allí?

  1. Keynote de apertura por parte de Holly Firestone, Director at Salesforce, Trailblazer Community and Community programs.
  2. Charlas en paralelo (inglés y español). Tanto si estás empezando como si eres un experto, seguro que encuentras una charla para ti ya que intentamos que los temas sean variados (desarrollo, administración, marketing, etc.) y para todos los niveles (old, new & hot topics) . Todavía estás a tiempo para mandar tu idea. Cerramos nuestro “call for speakers” el 1 de Febrero. Que no te de vergüenza dar un paso al frente y subir al scenario. Seguro que tienes experiencias que compartir.
  3. Stands para nuestros sponsors. Habla con empresas que ya trabajan con Salesforce ¿Quieres hacer algún negocio y comprar alguna app? Es tu sitio!! ¿Tu empresa se dedica a desarrollo pero no os vendría mal colaborar con otros usando su API y no tener que desarrollar algo que ya existe? Pregúntales!! Y quizás lo más importante es ¿estás buscando trabajo? Muchos de nuestros sponsors tienen puestos abiertos. Os daremos la oportunidad de tener pequeñas entrevistas el día del evento. Y si estás leyendo esto y piensas que tu empresa podría estar interesada en sponsorizar dreamOlé ’18, no dudes en ponerte en contacto con nosotros. Aquí puedes encontrar más información.
  4. DemoJam ¿Y qué es esto? Algunos de nuestros sponsors tendrán 3 minutos para mostrarnos su producto. Tanto si está en AppExchange cómo si no, pueden participar. Lo importante es mostrar la aplicación en vivo y en directo. Todos los asistentes de dreamOlé podremos votar por la que nos guste más, que se llevará un premio patrocinado por Salesforce AppEchange. ¿Y quien lo presenta? Contamos con Joshua de nuevo!! Muchas gracias!! ¿Todavía no te haces a la idea? Échale un ojo a la demoJam del año pasado.
  5. KeyNote de cierre por parte de Zayne, Salesforce Evangelist. ¿Te suena su cara? Normal!! Zayen presentó parte de la KeyNote de Desarrollo en San Francisco durante Dreamforce ’17 y nosotros tenemos la gran suerte de contar con ella en nuestro evento. Y no solo como speaker. Tanto Zayen como Holly estarán todo el día con nosotros así que no dudes en sentarte con ellas y aprender.
  6. After party. No te vas a quedar con hambre. Durante el evento ofreceremos desayuno y comida pero claro, una vez que terminamos, tenemos que celebrar este gran día con un picoteo, música, fotos, vamos lo que es una buena fiesta en España.

¿Todavía tienes dudas? ¿Ir ó no ir a Barcelona? Échale un ojo a nuestra web y mira las fotos de dreamOlé ’17 en Madrid. Al igual que el año pasado, contamos con un equipo que plasmará el día entero hacienda fotos y videos todo el día. Échale un ojo al video resumen.

Las entradas todavía no están a la venta, pero síguenos en Twitter y Linked-In para ser el primero en comprarlas. No te esperes al último minuto, el año pasado lo vendimos todo.

Recuerda, 27 de Abril, Hotel Catalonia Plaza, Barcelona, here we go!!

Process billions of records with Async SOQL

Christmas time is closer but I would like to deliver this last post before end of the year.

Some months ago, I wrote an entry talking about BigObjects, a feature that was General Available by Winter ’18 and via a use case, I tried to explain it. Now, I would like to follow that post with a new way to create records, Async SOQL.

Async SOQL is half GA by Winter ’18 and half still in Pilot 

The use case talked about moving Code Review custom object records, into Code Review History big objects records, and release storage of custom objects one. We want to Archive records, and Async SOQL will help us to deal with big amounts of data.

What is Async SOQL?

Basically Async SOQL allows you to run SOQL in the background so that, you will get a response after a period of time, but at the same time, helps you to deal with millions or even billions of records without hitting time outs or governor limits.

How can I execute Async SOQL?

Async SOQL is implemented as REST full API and in order to execute this SOQL in the background we need to run a post request:

Captura de pantalla 2017-11-29 a las 21.51.22

And provide a body in JSON format in order to make the call. Find bellow a really easy example that helps you to create Vendor__c custom object records based on Accounts.

Captura de pantalla 2017-12-19 a las 9.40.12What can we highlight?

query: allows you to define a SOQL. On our case, the object I’m going to read, Account and the field I want to recover, Name.

operation: help us to define what we want to do, insert or upsert (please check big objects entry to understand Primary Key and upsert, as it works in the same way)

Basically that is the main difference between simple SOQL and Async SOQL. With this new feature we can read and create or update records in one go.

targetobject: object we want to use to create new records. In our case, Vendor__c.

Then, we need to specify from where we want to get record field values and where we want to store this info. For that we have 2 keys in this JSON code.

targetFieldMapping: allows you to define source field and target fields

and

targetValueMap: allows you to map a target field with a literal value, for instance, we want all records have Spain as Country__c field value.

How is the response?

When we do the post call, we get a similar response:

Captura de pantalla 2017-11-29 a las 22.01.12

It is also in JSON format and basically it provides similar information that you passed in the post call. Just highlight 3 keys:

jobId: remember this is an asynchronous call so there is an Id related to the background job. You can also use it in the post call via the global variable $Job_Id as part of key value on targetValueMap.

status: helps you to know where is the job. Moving from New to Running, Complete, Failed etc.

message: before executing the call, the code is analyzed. If it realizes about a possible issue, it doesn’t start the call and provides an error message in that field. For instance, below message. My VendorName__c field size was too short to store all Account Names.

Captura de pantalla 2017-11-29 a las 22.11.03.png

How can I stop the execution?

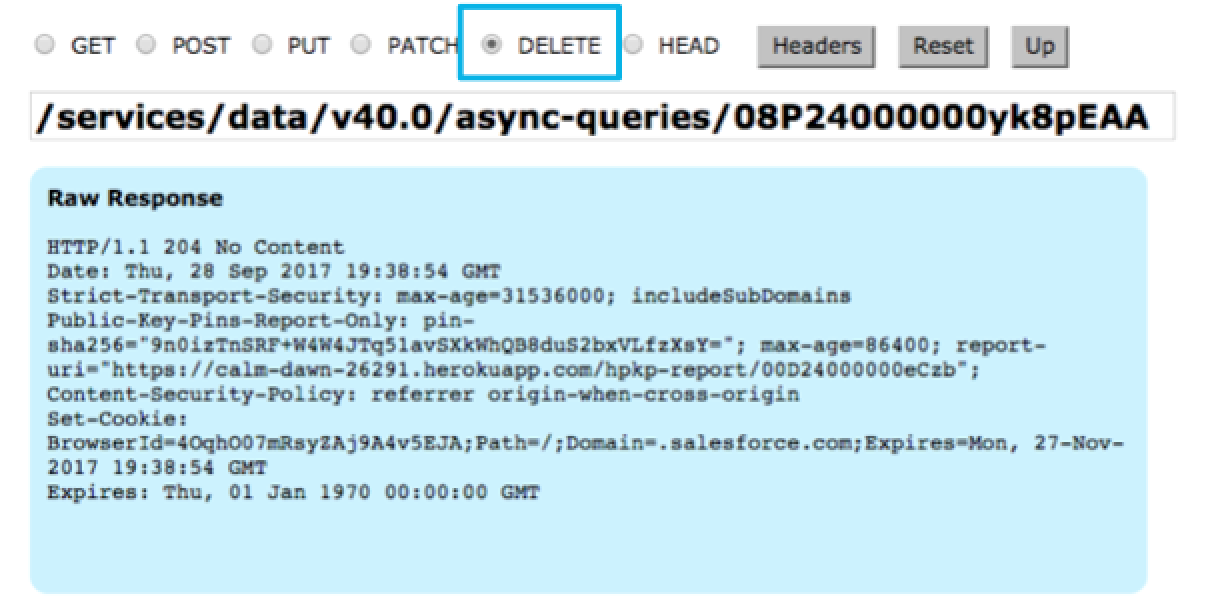
Async SOQL doesn’t provide a UI in Salesforce like other background jobs like Batch Apex or Queueable. But we can make an http delete call passing the jobId as part of the url.

Captura de pantalla 2017-11-29 a las 22.22.02

How can I check the progress?

Similar as before, as we do not have UI, we need to look for another way in order to get this information. For that, we have 2 options:

1º – Make a get post call: Similar to the cancel action, if we pass the JobId as part of the url, and do a get call, the response shows you information abut the background execution that is running in the system.

Captura de pantalla 2017-11-29 a las 22.32.33

2º – Make a SOQL against BatckgroundOperation object: This is a new object where we can see extra information about the job execution.

Captura de pantalla 2017-11-29 a las 22.32.42

But this is not the only new object that we can get in the system. We also have BackgroundOperationResult that will help you to identify any issue during the execution if the result is not the expected one. For instance. Bellow image shows an issue related to a field that is required but the source value is empty. In that case, a new error is logged on this table, but the execution doesn’t stop, it continues till the end.

Just keep in mind that this information would be removed after 7 days.

Captura de pantalla 2017-11-29 a las 22.32.55

And what about Archiving?

Yes, you are right. We promised to show you how to archive Code Review records but tried to explain the whole functionality with a really simple use case. Now it’s time to move to Code Review History use case.

As I mentioned before, we would like to create Code Review History records reading Code Review records. Similar as before we will do a post call but the body would be like this one:

Captura de pantalla 2017-11-29 a las 22.51.40

On BigObjects post, the object was called Test1CodeReviewHistory__b instead of CodeReviewHistory__b

And … that’s all. Simple, isn’t it?

Can I integrate this functionality into Apex?

Yes, of course, at the end we are just making http calls, so we only need to set the proper url, add it on my remote settings and create a string in JSON format for the body.

Captura de pantalla 2017-11-29 a las 22.42.57

Summary

Finally I would like to sum up some key concepts we have talked about.

  1. Async SOQL allows you to run SOQL in the background
  2. It takes some times but allows you to process millions or even billions of records
  3. You do not need to worry about governor or time out limitations
  4. It is implemented as REST full API
  5. You can make as many calls as you want per day but just a single one at a time
  6. You can read and create records in one go. Delete is out of scope
  7. This feature is part GA and part still in Pilot:
    1. Read Standard or Custom objects and create Standard, Custom or Big Objects is in Pilot
    2. Read Big Objects and create Standard, Custom or Big Objects is GA

Captura de pantalla 2017-11-29 a las 22.43.44